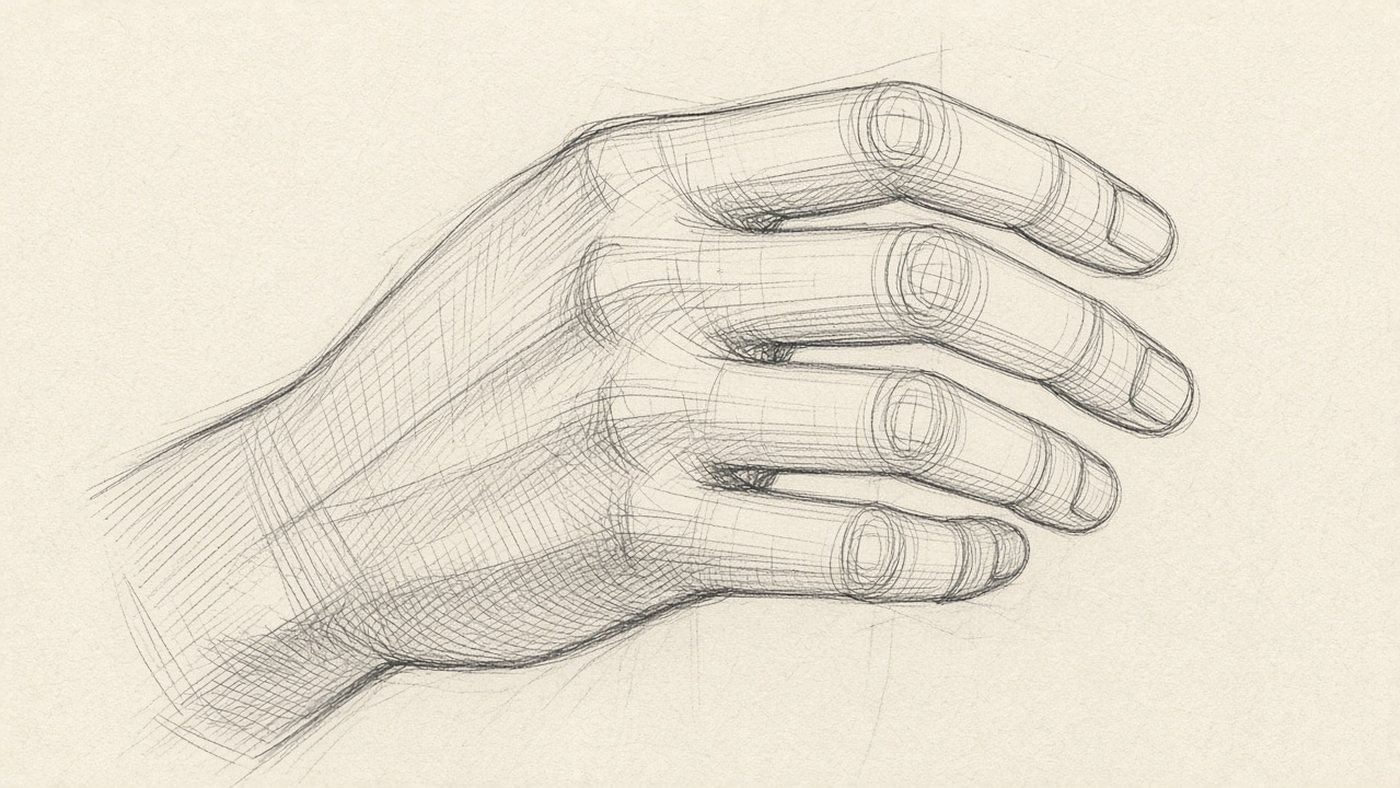
Simplifying the Hand
A hand is a box for the palm plus cylinders for the fingers. The thumb attaches at the side, not underneath.
The Palm as a Box
Draw the palm as a low brick: the width is almost equal to the length, and the thickness is about a third of the width. The knuckles sit on the front face. The wrist sits on the back face. Without that thickness, the hand becomes a flat fan.
The Thumb as Its Own Block
The base of the thumb is a wedge on the side of the palm, closer to the wrist. The thumb itself is shorter than the index finger, and at rest it sits at 45 degrees to the others. Parallel to the index finger, it looks like a pincer.
Fingers as Cylinders
Each finger is three cylinders, joined at the knuckles. The middle finger is the longest. The pinky is shorter and sits a little to the side. The cylinders taper toward the nail. The same logic of solid forms is in the article on drawing form and volume.
Hand Proportions
Two measurements cover most of the mistakes: finger length against the palm, and the arc of the knuckles.
Palm Length and Finger Length
The middle finger is almost as long as the palm from wrist to knuckles. Together they make a rectangle of about 1:2. The index and ring fingers are shorter than the middle finger by about a nail. The pinky reaches the last joint of the ring finger. The whole hand is about the length of the face. Body measurements are in the breakdown of anatomy for artists.
The Knuckle Arc
The highest knuckle is the middle finger's, and the row drops toward the pinky. A straight ruler makes a rake. The same arc repeats at the second and third joints, only steeper.
How Fingers Bend
Fingers bend only at the joints, and only inward. A joint does not bend backward.
- Mark the box of the palm and the line of the wrist.
- Place the wedge of the thumb on the side, closer to the wrist.
- Draw the knuckle arc along the front face.
- From that arc, draw four cylinders of different lengths.
- Mark two bends on each: at one-third and at two-thirds.
- Bend the joints to the gesture and check the silhouette as a black shape.
Three Joints and How They Work
The first joint bends to about 90 degrees, the second to 90–100, and the third is weaker, at 60–70. In a fist the nails face you. Don't bend a finger as one single arc. Three cylinders give you three planes and different light on each.
Fingers Move in Groups
The ring finger almost always follows the middle finger. The pinky lags a little behind. The index finger is freer. The thumb lives on its own. If all four spread in different directions, the gesture looks broken.
Gestures and Character
The character of a hand is in the silhouette, not in the nails. Decide first: is the hand relaxed, or is it working?
A Relaxed Hand
The fingers are slightly bent in a fan, the thumb is held out, and the wrist droops a little. The fingertips line up on a soft arc. The gaps between the fingers are different widths. Don't make them identical.
Tension and a Grip
In a grip the palm folds into a trough, and the thumb presses the object against the index and middle fingers. For a fist, hide the fingertips behind the box: what sticks out are the knuckles and the fold of the thumb.
Tip
Photograph your own hand from the same angle as the drawing. Hold the phone at the model's eye level, or the diagram will not match.
Exercises
Ten short sketches of your own hand teach more than an hour spent on one "perfect" finger.
Your Own Hand in 10 Positions
- an open palm facing you, and the back of the hand;
- a relaxed hand from the side, the way it hangs along the body;
- a pointing gesture and a fist;
- gripping a mug and a pencil;
- the hand in three-quarter view, fingers toward the viewer;
- resting on a table: the palm lying flat.
Spend three minutes on a gesture: the box, the arc, the cylinders. The same limit is described in the guide on sketching for beginners.
The Hand from Memory
Close the reference and draw the gesture again. Compare the length of the middle finger to the palm, the knuckle arc, and the angle of the thumb. Write the mistakes down and repeat them tomorrow.
Time to draw, not just read
Theory fades in a couple of days if you never use it. Open the editor and spend 15 minutes on what you just read. That is enough for the skill to stick.
Try it now
A free online editor: brushes, layers, a palette, and a shared canvas. No install and no sign-up.
Start drawingTopics in this guide
- how to draw hands
- constructing the hand
- drawing fingers
- a hand diagram for drawing
- hand gestures
← How to Draw Eyes: Structure, Highlights, and a Living Gaze How to Draw Hair: Strands, Volume, and Shine Instead of a Cap →